Sunday, March 13, 2011

Are you sitting down? I’ve been working on adding track. That’s right, I’m finally getting around to that. Shocking, I know.

It had always been my goal to make another loop inside the initial one. But to do so, I needed 5 more turnouts. It took a while for me to save up enough to buy all those, but a Birthday present from my Granddad finally tipped the scaled. In addition, I dug through my box o’ junk (ever model railroader has one) and found TWO of the Peco Electrofrog switches from the layout I had started in high school. (It’s a pity I didn’t use all electrofrog switches on that layout, as I would have plenty of turnouts if I did).
(Side note: The “frog” of a turnout is the part where the route diverges. Most commercial turnouts have insulated frogs, which makes wiring easier. The Peco Electrofrogs are powered through the frogs, which makes stalling on a turnout a rare occurrence. This is important if you’re like me and run small-wheelbase locomotives.)


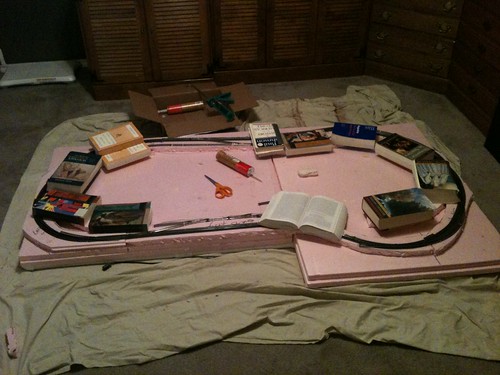
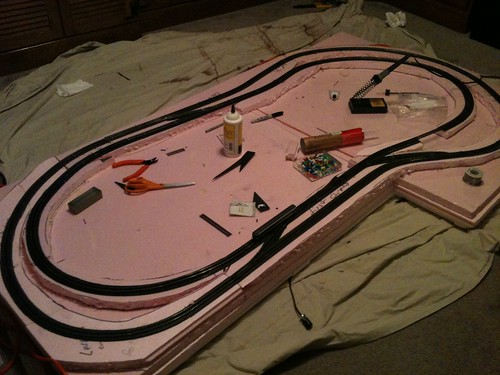
I’ve never been a very good track planner on paper, so I started by simply mocking up the track for real. Pretty soon I came up with a loop that 1) made me happy and 2) worked with the track that I had. I decided pretty early against doing a simple double track main, as I figured that would get a little boring. In addition, I knew I would need flextrack to do that, and my nearest source of flex track (nee ANY MR specific item) is 100 miles away.

After blocking out the track, I moved everything off the layout and then hauled the entire thing off to the living room. I thought it would be easier to work on the layout if I had access from all sides, and I wasn’t really looking forward to soldering all that track in the back of the layout, either.

With the layout in the living room floor, I blocked out the track again. My next task would be to cut out the foam shapes I would need for the cookie-cutter roadbed.

Let me say this: Lesson Learned: next layout, none of this cookie-cutter nonsense. I started out doing that because I thought (as told by the gods at Woodland Scenics) that it would be easier when it got to scenery. Well, that remains to be seen, and cutting foam is a PITA. Last time I pretty much bored a tiny hole in my skin from the handle of the kitchen knife I used to cut it.
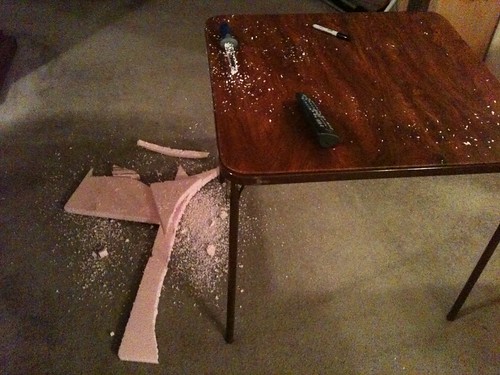
This time, I was determined to get a proper cutting tool, so I went to Lowe’s and invested in a nasty-looking thing I’d seen recommend on the various MR forums: A wallboard saw. This tool is designed to cut sheet-rock and other wall materials. Both blade surfaces are serrated, and the tip of the knife comes to a sharp, broad point. It’s easy to puncture the foam and saw out what you need.

Anyway, I took a few sections of track at a time, laid them out on the foam (I still had enough left from my initial foam purchase), and cut out sections with the saw, using a cardboard table brace the foam against whilst I cut.

Creating is messy

After all the pieces were cut, I laid them out under the track and marked their placement on the layout with a sharpie. Then I removed all the track and got out one of my favorite tools: the caulk gun.

I don’t know what it is about this thing but it sure is fun to use. I still had two tubes of “Liquid Nails for Projects” left from the last time I did layout construction. I spread a liberal bead of the tan glue over the areas where the pink foam risers were going to go, then smoothed it out with a spare piece of scrap foam. After waiting a few seconds for the glue to get a bit tacky, I pressed the pink foam into place, then weighed each piece down with old Norton Anthologies. Who says college doesn’t pay?


Weighing down the foam

After waiting two days for the glue to fully dry, I removed the books and laid out the track once again. I used a sharpie to mark the location on the foam. The next step was installing Woodland Scenics’s trackbed. This is a roadbed product that is a substitute for the traditional cork. I used it on my last layout and loved the stuff, so I’ll probably continue to use it from now on. It’s very easy to shape the curves.

I bought a continuous roll, so I was able to lay the roadbed in one single piece. Made things very easy. I have a small 4.5” bridge on the inner loop, so I started laying the roadbed at that gap. I spread a thin film of Woodland Scenic’s foam tack glue on both the roadbed and pink foam, then let it sit for a few minutes to get tacky. I then carefully pressed the roadbed into place, adjusting it to fit the track. I pushed ordinary push-pins into the roadbed to hold it down while the glue dried (especially necessary on curves).


IMG_0895

After waiting ANOTHER DAY (model railroading has a lot of “hurry up and wait”), I removed the push pins and laid out the track one final time. I spread another bead of foam tack glue on the roadbed, then pushed the track into place, again securing it with the push pins. After another 24-hour waiting period, I removed the pins, then pushed around a Swiss passenger car (the longest car I have) on the newly-laid rail to check for any obvious problems.


IMG_0897

Next time: wiring.

Wednesday, February 16, 2011

Hey look I did something!

Well, it’s been awhile. Again. As is my wont, I suppose. You should be used to it now. I’m worse than Matt from X-Entertainment.

Looking at my last post, I had just attended the Temple Train Show in September. Fast forward 6 months, and I haven’t made all that much progress.

Funding remains my primary issue. I estimate I need at least 4 more turnouts to get the inner loop laid out and operational. At $14 a turnout, that’s rather expensive.

In the meantime, I’ve been working on buildings. I now have four buildings and a water tower pretty much “complete” (save for weathering/detailing). I’ve discovered that I really enjoy building wooden laser-cut kits—Somehow they just look more real than the plastic buildings (at least, if the building is meant to be made of wood).

Here’s my latest project that I finished. It’s a Northeastern Scale Models kit called “Valley Hardware and Plumbing.” Personally, it looks a bit big for a hardware store, so I’m not sure what it will be on my layout yet.

Structure kit


Anyway, it went together easily enough. I painted it a light grey, then when I went to paint another coat I used a darker grey by mistake. I was going to just sand it off, but I realized that by sanding lightly I let the lighter grey shine through, and it gave nice “aging paint” effect.

The shingles provided was just a graphic on a piece of light grey paper, and I wasn’t sure how to color it and preserve the shingles. I asked the folks on Trainboard, and they said to use chalk, so I broke out the chalks for the first time in a LONG while. I’ve forgotten how messy it is. Probably shouldn’t be doing it over carpet, either, but oh well!

I also found these great new paint brushes called “microbrushes,” which are basically one-time use brushes meant for tiny detail work—like the white cornerposts on the model here.

Building these wood kits takes lots of time and patience, but I think the end result is worthwhile.

Now my problem is that I’m almost out of structures to build. Oops? Guess I need to buy some more!

I’ve got a new locomotive on the way, so hopefully there will be another post soon. If not, see you in 6 months.

Sunday, September 19, 2010

I'm the worst Blogger EVER

I guess I'm not doing a very good job at keeping this blog updated, am I? Well, my hobbies tend to go through phases, and I haven't really been into Model Railroading very much in the last couple of months.

I did make it to the Temple train show yesterday, however--maybe that will provide some inspiration. I've got some structure kits to work on, and I have some track to lay, too.

Anyway, here are some photos from yesterday. Mainly to give me something to shoot for!

New Beetle!

IMG_0220

IMG_0215

IMG_0198

IMG_0175

Maybe in the next week or two I can actually get some work done! Time will tell...

Wednesday, January 27, 2010

Building...Buildings..

This past weekend I spent a little bit of time working on some structure kits. Mainly painting. Having insufficient funds to procure the amount of turnouts I need for the next phase of track laying, there’s not a whole lot I can do besides work on these old structure kits.

After doing some painting I decided that I would drag out the umbrella lights and take some nice pics (well, actually I got the lights out to take some pics of my Macs, but I digress).

Here’s the first building, very much a work in progress. It’s basically a little shop. It’s molded in brown, which I must say is a ridiculous color to mold things in. However, this may work to my advantage.

IMG_5094

I’m trying to paint it a brick red color. I chose a dark red acrylic. I’ve been painting over the brown and finding the brown shines through a little bit, making a mud-brick look. I’m not exactly sure if I like it or not…will have to think about it.

The second building is one of Grandt Line’s “Company Houses.” It’s intended to represent the company-owned homes that were everywhere in the Appalachian country.

IMG_5090

One thing I have learned is that macro photos certainly make all your blemishes stand out like a sore thumb! I clearly need to do some touching up with the paint on the edges of the roof and the foundation. I wasn’t exactly sure what color to paint the roof. It’s clearly made of wood shingles. If I had any, I would use some stick-on paper shingles. But I don’t, so I opted for a dark brown. You can still see the brush strokes, but I think with a little weathering chalk it will look fine.

Next on the to-do list is to install window “Glass” in all the windows and glue the entire thing together. I will probably come up with some sort of interior, too, so that when you look into the windows you actually see something—and not just out the other window.

While I’m on the subject of structures: I’ve realized that building structures is one of the FIRST things you should do when planning a model railroad, rather than the last. I suppose I first realized this by following Spookshow.net and his layout builds. He always builds all the structures first. I’m quickly finding that this is the way it should be done.

When the structures are built first, you have something tangible to put on the pink foam plains, which helps with track design. You can plan out how you want a city or industry to look and design your track to fit it—rather than vice versa.

I suppose it’s more prototypical in some cases, as well. Industries, etc, may have already existed, and tracks were laid around it.

Clearly, then I have a lot of structure buying and building to do. Considering I’m broke and have no hobby shop locally…maybe I should give scratch building a try?

Tuesday, January 19, 2010

As a child of the internet, I spend a lot of time browsing the web reading forums about my favorite pastimes. Right now, there are 9 tabs open in my browser, including a video game site, a Macintosh site, and two Model Railroad sites. It is suffice to say that I sometimes suffer from information overload—posts get skimmed instead of read. Topics that I might enjoy engaging in conversation over are skipped because I simply don’t have time to write a response—some other post on another site needs my attention.

There was a post on Trainboard.com today, however, that really got me thinking. The “OP” (original poster, the person that started the topic) inquired as to how many layouts you had been through. In other words, how many layouts you had constructed and completely scrapped.

The answers were rather surprising, at least to me. Most people responded that they were on their 3rd or 4th layout. To me, that’s rather encouraging.

Oftentimes, this hobby can be intimidating for the inexperienced. The industry’s main publication, “Model Railroader,” has long been criticized for showcasing only “finished” layouts from modeling gods which the average person can never hope to match in quality and size. Internet forums have lessened this somewhat, but the quality of work shown on the “Weekly Photo Fun” and “Sunday Night Photo Fun” threads (at Tainboard.com and the Atlas Forum, respectively) can often be intimidating in its own light.

So it was encouraging to hear that most everybody else had screwed up their first layout royally, too.

Myself, I’m on layout number 3…of the N-Scale variety, anyway. My first layout was far, far too big and far too ambitious. I bit off way more than I could chew. Of course, that was compounded by the problem that I only had about 2 years to work on it before I moved away to college. Lesson number one: Make it portable, because you never know when you might have to pick it up and move it.

Layout number 2 got me all the way through college. Looking back, it was a great learning experience. I think I’ve already recounted that here on this blog, so I won’t dwell on it.

As for layout number 3, well I’ve already hit many stumbling blocks. I guess the question is this: When you hit a stumbling block, do you continue on (often with a compromise), or do you tear it up and start over?

The responses in the Trainboard thread seemed to indicate that most other people follow my way of thinking: When I get stuck with something or it doesn’t turn out exactly the way I planned, I just keep on going. I’d rather not take the time to fix it if it means tearing up a lot of work in the process. Instead, I can file away that knowledge for future use—the inevitable layout number four.

I guess that almost sounds like you can settle for mediocrity, which is not exactly what I mean. But given the choice between spending hours ripping something up and re-doing it and just living with it (as long as it is not a show-stopper), I’d rather just live with it.

I’m don’t think I’ve really communicated my idea very clearly in this post…I will have to give it some thought and re-visit this topic in the future.

Sunday, January 10, 2010

Swat. Swat. Cough. Oh! Hey there! Don’t mind me, I’m just dusting a little and sweeping away the cobwebs.

I see my last post was in June? Huh. Well, anyone that knows me at all shouldn’t really be surprised by this. I have too many hobbies, and my interests tend to ebb and flow like the tides. I lost interest in trains for a while—partly because I just wasn’t sure where to go next. Partly because Roswell reared its head and I got into VWs again for a bit. And partly because that’s just the way it is.

Anyway, in December, Baylor’s Mayborn Museum hosted their annual layout setup (mainly composed of Temple’s excellent “Centra-Mod” modular group). On one of the last weekends before Christmas, I made the trek out—camera in tow—and I’ll be damned if the bug didn’t bite me again.

(You can see my pictures from that event here. )

Reading over my older blog posts, I see that the last challenge I was concerned with was legs for the layout. That problem was solved thanks to my parents, who brought down the last remaining piece of my Dad’s old bedroom furniture, a triple dresser (solid maple). So now the layout rests on that, and I have storage in the drawers below for modeling junk and other assorted odds and ends.

So now that problem is solved, and I find myself wondering where to go next. All I have right now is a basic loop of track—the roundiest of “roundy-rounds.” I’ve debated for several months what I want the inside of the track plan to look like (track-planning in advance is certainly not my forte).

I’ve decided that I really want the ability to run two trains at one time, so there will have be an inner oval. I’ll likely have to use almost all 11 inch radius curves here—maybe a 19 in here or there. I think I have worked out that there will be an industry on the left side of the layout, and a city (possibly with a small yard) on the right. I don’t want to get too much going on in the middle to avoid the “spaghetti bowl” effect of having track everywhere.

So what’s next then? Saving money until I can afford to buy more turnouts. I think I’ll need another four for the inner loop, so that’s $60 right there. This is an expensive hobby.

In the meantime, I can work on structure kits that have been festering over the years. I’ve gotten half-way on a number of buildings, but I still don’t have any that I would call “complete.” Time to change that.

Finally, I went to the Waco Winter Wonderland trainshow this weekend. This show is always something of a crap-shoot. Sometimes they have tons of stuff. Other times, nothing. One year I didn’t make it back in town until Sunday, and the vendors had already packed up and gone!

This year I am happy to report that there was a good selection of vendors (for a Waco show, anyhow), and an excellent N scale modular setup all the way from Houston. Please visit Flickr to see my pictures.

I was really happy that the vendors were there. As I have recounted before on this blog, Waco’s model railroading selection just plain sucks. So very rarely do I get a chance to look at things in person. I was hoping to spend no more than $40. In particular, I was looking for laser-cut wood building kits. Unfortunately, no one had any of these. So I began looking at the other items available and walked away with some rolling stock and a locomotive for about $60.

IMG_4946

First up: Micro-Trains 33’ Peaked-end hoppers, lettered for N&W. N&W had thousands upon thousands of these, and they are essential for anyone modeling the area/era. Unfortunately, not many manufacturers are making them. I bought a three-pack of Micro-Trains cars for $35, which I think is a very fair price (didn’t I tell you this was an expensive hobby?). I do wish the hoppers had coal loads, but what can you do? I’ll just have a string of empties.

I wish I could find a source for these that wasn’t so expensive. I’d like to have at least 20 on the roster. That’s $240. Go take a look at some of the coal trains running on the modular layouts at the train show. That probably represents $1000 or more. Crazy, isn’t it?

My second purchase was a Life-Like GP-18 for the low, low price of $27 after tax.

Life-Like GP18

IMG_4937

Some background here: I’ve wanted a small diesel for a number of years. I love steam, but it’s nice to have some variety. The N&W was the last Class One railroad to diselize, in 1960. They used mainly Alco RS-11s and EMD GP7s and GP9s. (the family of which the GP18 is a slightly later model).

So I’ve been looking for some time for GP9 or GP7. The models I found were too expensive (that money could go to turnouts!), or in a much later paint scheme than what I was looking for. So I was elated when I found the little GP18 sitting at the dealer’s booth for only $24.95, in black liverly. I was skeptical, of course. $24 for a locomotive? Loco’s in N Scale are usually in the $70-$120 range. Still, I thought I remembered reading posts on the Atlas forum praising this cheap locomotive. So I bit the bullet.

Arriving home, I sat the loco on the track and slowly turned up the juice. Nothing. So I cranked up the power a little more, and suddenly she started forward. I think part of the problem is that this is a fairly old unit—likely made in 1993 or 1994, and thus it might have been sitting in the box for a long, long time. After several hours of break-in (both forward and reverse) I am very impressed by how she runs. For $27, it sure is a winner. There is a slight wobble at times, but slow speed performance is pretty good (good enough for me, anyway), and it goes around the track very smoothly. If this is what a cheap diesel will do, I can’t imagine a nicer Atlas or Kato unit. As a steam guy who is used to finicky steam locomotives, you diesel guys sure do have it nice!

One final little note on these: N&W used “High-Nose” GP-x models, which means the nose in front of the cab (the short side) extends all the way to the roof. Engineers often complained about visibility, so most railroads got the short nose versions. However, the N&W, being “different” as they always were, ran these locos with the long hood in the front! That’s right, the cab would be at the very back of the locomotive, with the extremely long hood sticking out towards the oncoming track. Supposedly, the reason this was done was that the N&W brass thought it would offer more protection in a crash. Personally, I think it was just another case of being stubbornly stuck on steam. With the long hood forward, the locomotive almost looks like some futuristic steamer, with a long boiler in front.

Anyhow, that’s where things stand today. I don’t make any promise of regular updates (I’m too smart to promise that!) but I will try to not let it go another 6 months!

Saturday, June 13, 2009

A whole lot 'o nuthin.

My apologies for the lack of updates, which is in direct proportion to the lack of progress, which is directly proportional to my lack of funds.

Well, sort of. Here’s the situation as it is now:

As I may have reported previously here (I’m far too lazy to reread my updates!), the ½ in. PVC pipes that I got to form legs simply won’t cut it. The whole rig is far too wobbly to be of use. So it’s back to the drawing board. My new I idea is to construct a table-like uh…construction using PVC. Of course, this time, I will use a larger diameter of PVC pipe—perhaps even two inches. I should be able to build a fairly strong frame using this method that the layout will simply sit on.

If that method fails, I guess I’m going to buy a portable table. But right now, I can’t do anything, because I simply don’t have the funds to purchase either a table or the PVC. Other things have to come first. You know. Like….eating. And Air Conditioning.

In the meantime, I still haven’t figured out a track plan for the interior of the loop that I have completed. I have a few general ideas, but nothing concrete. I’ve kind of been holding off on working on anything until I get the base built. So it will be awhile. But hey, Rome wasn’t built in a day, as the cool kids say.

Anyway, I’m not too concerned about the lack of progress. Model Railroading is a long-term hobby. If you’re looking for instant gratification, this isn’t the hobby for you. It takes planning, time, effort, and money to build a model railroad. So when these are lacking, it’s time to sit back, read the most recent copy of MR, and dream.