Whilst waiting for my next shipment of track to arrive, I have been working on a structure kit. It’s Bar Mills Model’s “Swanson’s Lunch Stand.” (See here: Bar Mills Link).
Now, I’ve built lots of plastic kits before. Both model railroad structures, and the scale model variety that nearly every boy puts together at some point in his life. And yes, some of my model efforts were better than others (that reminds me…I still have an Enterprise 1701 kit to finish painting). But this is the first “craftsman” kit that I’ve built.
Basically the word “craftsman” means “we give you a bunch of wood and you build a real house out of it.” Actually, this particular model is not very complex. The wood is laser cut, so it looks great. Many of the pieces have an adhesive backing, so it is literally peel-and-stick…no glue required.
Anyway, I would never had had the patience for something like this when I was a kid. You basically have to work on a tiny piece at a time, then set it aside to let it dry. I’ve been working for the last few days, and while I’ve made a lot of progress, I’m still only doing basically one thing a day. Glue a part, call it a night.
In reality it’s pretty satisfying, and I think this will be the first structure kit that I’m really happy with the final appearance.
But there’s one thing I am having a problem with—the roof. The manufacturer didn’t include any instructions on what you should do with the roof. As built, you can see these big slats that make up the interior details. It really looks ugly. So I got to thinking, and I realized that I had no idea what roofs for these type of buildings look like. I asked on the Atlas forum and got some great suggestions, but it brings up a good point that I’d like to discuss a bit.
The next time you are walking around the neighborhood, or your workplace, or any familiar area, try to look through the scene through a modeler’s eyes. How would you accomplish certain details? Did you notice the brickwork is done a certain way, or that the bushes are all planted at certain intervals? Or notice the weathering on the sidewalk—what color it is, how dirty it is, where the cracks are and how they are formed. Challenge yourself to do this, and you’ll notice all kinds of details that you never noticed before. You may gain a new appreciation for the locale.
I think this is one of the facets of model railroading that really draws me to the hobby—it forces you to be observant in your viewing of the outside world. To capture something in miniature, you have to know what it looks like at “1:1.” As a bonus, this kind of thing is also great as a writer, since writing requires a careful attention to detail to construct a scene on paper for the reader.
Take a careful look at the world the next time you step outside; you’ll be amazed at what you will find.
Wednesday, April 22, 2009
Sunday, April 19, 2009
Witty Train-Related Title!
Great title, huh?
Well, there hasn’t been too much progress, but I though I would give an update, anyway. When we last spoke, I had just glued the first sheet of pink foam to my frame. The next day, I felt that their wasn’t enough glue holding the joints, so I put another layer of Liquid Nails around the seam lines. Once again, I weighed the frame down with some college textbooks.
After that had dried for a day, I felt it was dry enough and strong enough to flip over. So I turned the whole assembly “right side up.” The liquid nails seem to hold very strong, and I was happy to discover that the whole thing is still very lightweight. My next task was to glue the second layer of Pink foam. Apparently the measurement of this was off by 1 inch, so one when gluing them together there was a 1 inch gap between the pieces. However, I had plenty of foam left over, so I just cut a small strip to fill the space. Again, I used liquid nails to glue all of this together and weighed the sections down with Norton Anthologies. I guess they’re good for something!
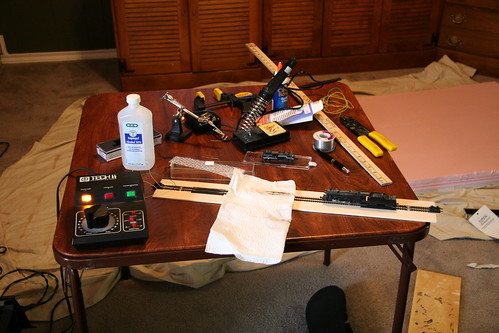
My track came in on Friday, but most of Saturday was spent with heavy books on top of foam, so I couldn’t get straight to track planning. So in the meantime, I decided to make a Locomotive test/cleaning station. I went to Hobby Lobby and picked up some dirt cheap small paintbrushes (for dusting the locos) and a small strip off Basswood. When I got home, I glued some straight track and two Atlas re-railers directly to this strip. Next, I soldered on some feeder wires. This was an adventure in itself. I should have used some flux paste, but opted not to waste any as I didn’t really care about the quality of this trackwork, so long as current got to it. Well it has been years since I’ve soldered feeders and DAMN it is no fun at all. I need to practice!
On the topic of soldering, I’ve pretty much decided that I will solder all of the track together, except for the turnouts which will be “free-floating.” All of this will have to be done “at the workbench” due to the ability off the soldering iron to melt the foam. It will be a pain in the ass, but necessary for good electrical conductivity. I’m also planning to drop feeders every foot and a half or so. I don’t think each piece of track in necessary, but I’ve learned my lesson that more feeders = better running.
But I digress. Back to the test stand. I now had a nice stretch of straight track with power. I got out the first loco (an Atlas Shay) and gave it a test run…With some prodding, she finally began to move. I think part of the problem is these locos need to be broken in more—most have not run in nearly three years (some even longer!).
Every loco needed the wheels cleaned. To accomplish this, I took some strips of paper towel and soaked them in rubbing alcohol. Next I laid the wet paper towel across the track, and moved part of the loco’s wheels on top of it. The trick is to keep part of electrical pickup of the loco on the non-paper-toweled section, and then crank the throttle whilst holding the engine in place. Do it right, and the drivers spin, wiping gunk off.

I was able to get almost all of my motive power running again, save for a few stubborn and old locomotives which need more than just a good cleaning. The Kato Mike (which is now 13 years old!) had never had the wheels cleaned and my GOD I was astonished at how black the paper towel was. I may need to do another cleaning of this loco with goo-gone first, as there is still a visible bit of gunk on the drive wheels. No wonder she had trouble moving!
With that bit done, it was time to finally start messing with the track. I quickly discovered two things: 1) I could use more 19 inch radius stuff than I though and 2) I didn’t buy enough 19 inch radius track.
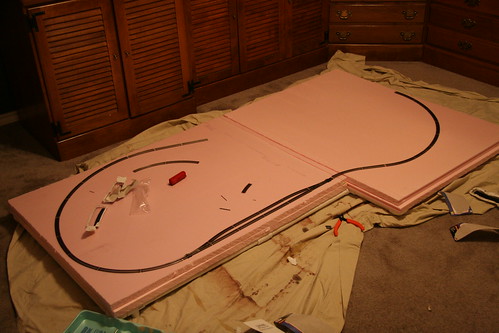
Here is a picture of the basic plan that I’ve mocked up. I’m well aware that it’s a little lopsided. My goal here was not to put the most track possible in place (the “spaghetti bowl” seen so often on small layouts) but to instead emphasize broad curves and to get away from the “train set” look of straight tracks parallel with the edge of the layout. On the back straight section, there will be a right-hand switch that leads to a yard/steam loco maintenance facility. On the passing track at the front of the layout, there will be a switch leading off to industrial spurs, etc. I can’t afford many switches now, so these things will have to come later.
Anyway, I placed one more order with gohobbies.com for another Peco switch, some more 19” radius track, and a 2008 Walther’s catalog (only $5 for catalog, so I thought why not!). This amount of track should get me a basic loop and let me start to run some trains.
Unfortunately, I won’t be able to do much this week since I need to clean the house for a visit from my parents. I may work on some structure kits that I have left over from the last go around. In any case, things are progressing, just slowly!
Monday, April 13, 2009
Progress is his middle name!
Some pictures of this weekend’s progress:
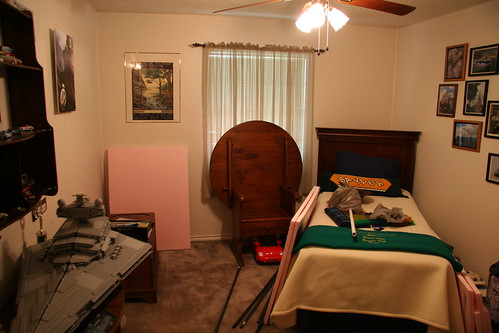
First, we have a shot of where the layout will go. Originally, the table/chair was in the table configuration, with the old layout on top of it. I removed the old layout and shuffled some things around. Wow! I have a lot more space here than I thought! Good to know.

Speaking of the old railroad, here’s the final picture I took before hauling it to the dumpster this morning. I salvaged a bunch of turnouts, some insulated rail joiners, and three terminal strips. If you know me, you know how hard it is for me to throw things like this away (especially things that I spent several hard hours and several hundred dollars working on. But I was out of space and wanted to get the old one out of my sight. So off to the rubbish bin it goes!
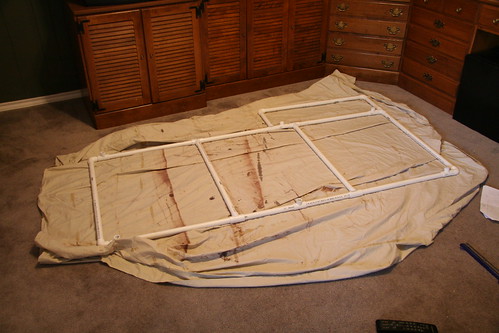
Next, we have a picture of the PVC frame that I built for the railroad. Not much to say, it’s a bunch of PVC pipes.

…and here is what it looks like on the legs. I’m still not sure about the stability of these legs, but we shall see. The nice thing is that thanks to snap on PVC fittings, I can easily change it. You can also see the foam that I got, too. More on that in a moment.

Finally, here is a picture of the foam being glued to the frame with Liquid Nails.
Since I last wrote, I picked up the 1” pink polystyrene foam insulation that will serve as the foundation for the railroad. I went to Home Depot for this, as Lowe’s only had ½” thick sheets. I really wanted a 2” sheet, but apparently they don’t have those in Texas. (This doesn’t make sense to me, because insulation is supposed to keep the air temperature stable inside the house, so why wouldn’t you want to use the thicker kind?).
The stuff is only sold in 4x8 sheets. Said sheets most definitely do NOT fit in a VW New Beetle. So I had to get them cut. I found a salesman to help me and he was more than happy to do so. Now, I thought we could just take them to the circular saw, make the four cuts, and be done with it. But apparently the guy that was helping me either didn’t think of that, or didn’t think it would work. So he tried cutting it with a regular razor blade. Well, that didn’t go over to well (it wasn’t deep enough), so he went off in search of better tools and returned with…a kitchen knife. No, not even a steak knife—a plain old kitchen knife.
Now, I’m internally laughing at this whole situation. Here we are in the HOME DEPOT of all places, and the best tool this guy can find is a kitchen knife. When this clearly won’t cut it (hah!), he goes off again and returns with a handsaw. Finally we make some progress and the foam is cut in minutes. I really was grateful for his help, though, and at no charge!
I got the foam home. It barely fit in the car, and now there are pink beads in the backseat! The first thing I did was vacuum each piece to remove excess beads. I tell you this stuff is a mess when it’s cut. It’s not as bad as the white-beadboard Styrofoam, but still bad. I should think about getting a hot-knife/wire for making the scenery out of this stuff.
Next, I set the layout up on the legs in the layout room. It’s actually fairly stable when up against the wall. With a sharpie, I marked the angle of the snap on leg supports, then hauled the whole frame outside and glued them in place with PVC cement. And man is that stuff noxious! But on the good side, it sets extremely quickly!
After yet another trip to the hardware store, I returned with some tubes of Liquid Nails for Projects. If you use this stuff, be absolutely certain you get the latex-based kind. The “normal” kind will eat through the foam! You apply the Liquid Nails using a caulk gun, which I had never used before. And man is it fun. I wish I had some things to caulk around the house, just so I could mess with it more.
I placed the frame on top of the pink sheets, carefully positioning them to get the closest fit. Despite my careful measurements, the pink sheets are a little bigger in spots then the frame (I’m guessing the 4x8 sheet isn’t “exactly” 4x8). But in the end, this isn’t a problem as I can easily cut the stuff later if I want. I marked the frame’s location on the foam with a sharpie, then lifted the whole thing up and applied a generous bead of Liquid Nails in the marked zones. I carefully set the frame back down, using the guidlelines and “eyeballing” it to ensure proper fit. Then I added beads of Liquid Nails along the sides of the frame. Finally, I laid some heavy college textbooks (thanks, Norton Anthology of American Literature, I finally found a use for you!) on top of the frame to weigh it down.
So that’s where I am at the moment. I’m hoping by the end of next week my track will be here, and I’ll be able to start working on a trackplan. I’m going to try and get my basic loop done first, and any turnouts will have to come later. I have been considering a double track main, but when I think about the prototype (small mining subsidiary), that makes no sense. So I’m still thinking about it.
First, we have a shot of where the layout will go. Originally, the table/chair was in the table configuration, with the old layout on top of it. I removed the old layout and shuffled some things around. Wow! I have a lot more space here than I thought! Good to know.
Speaking of the old railroad, here’s the final picture I took before hauling it to the dumpster this morning. I salvaged a bunch of turnouts, some insulated rail joiners, and three terminal strips. If you know me, you know how hard it is for me to throw things like this away (especially things that I spent several hard hours and several hundred dollars working on. But I was out of space and wanted to get the old one out of my sight. So off to the rubbish bin it goes!
Next, we have a picture of the PVC frame that I built for the railroad. Not much to say, it’s a bunch of PVC pipes.
…and here is what it looks like on the legs. I’m still not sure about the stability of these legs, but we shall see. The nice thing is that thanks to snap on PVC fittings, I can easily change it. You can also see the foam that I got, too. More on that in a moment.
Finally, here is a picture of the foam being glued to the frame with Liquid Nails.
Since I last wrote, I picked up the 1” pink polystyrene foam insulation that will serve as the foundation for the railroad. I went to Home Depot for this, as Lowe’s only had ½” thick sheets. I really wanted a 2” sheet, but apparently they don’t have those in Texas. (This doesn’t make sense to me, because insulation is supposed to keep the air temperature stable inside the house, so why wouldn’t you want to use the thicker kind?).
The stuff is only sold in 4x8 sheets. Said sheets most definitely do NOT fit in a VW New Beetle. So I had to get them cut. I found a salesman to help me and he was more than happy to do so. Now, I thought we could just take them to the circular saw, make the four cuts, and be done with it. But apparently the guy that was helping me either didn’t think of that, or didn’t think it would work. So he tried cutting it with a regular razor blade. Well, that didn’t go over to well (it wasn’t deep enough), so he went off in search of better tools and returned with…a kitchen knife. No, not even a steak knife—a plain old kitchen knife.
Now, I’m internally laughing at this whole situation. Here we are in the HOME DEPOT of all places, and the best tool this guy can find is a kitchen knife. When this clearly won’t cut it (hah!), he goes off again and returns with a handsaw. Finally we make some progress and the foam is cut in minutes. I really was grateful for his help, though, and at no charge!
I got the foam home. It barely fit in the car, and now there are pink beads in the backseat! The first thing I did was vacuum each piece to remove excess beads. I tell you this stuff is a mess when it’s cut. It’s not as bad as the white-beadboard Styrofoam, but still bad. I should think about getting a hot-knife/wire for making the scenery out of this stuff.
Next, I set the layout up on the legs in the layout room. It’s actually fairly stable when up against the wall. With a sharpie, I marked the angle of the snap on leg supports, then hauled the whole frame outside and glued them in place with PVC cement. And man is that stuff noxious! But on the good side, it sets extremely quickly!
After yet another trip to the hardware store, I returned with some tubes of Liquid Nails for Projects. If you use this stuff, be absolutely certain you get the latex-based kind. The “normal” kind will eat through the foam! You apply the Liquid Nails using a caulk gun, which I had never used before. And man is it fun. I wish I had some things to caulk around the house, just so I could mess with it more.
I placed the frame on top of the pink sheets, carefully positioning them to get the closest fit. Despite my careful measurements, the pink sheets are a little bigger in spots then the frame (I’m guessing the 4x8 sheet isn’t “exactly” 4x8). But in the end, this isn’t a problem as I can easily cut the stuff later if I want. I marked the frame’s location on the foam with a sharpie, then lifted the whole thing up and applied a generous bead of Liquid Nails in the marked zones. I carefully set the frame back down, using the guidlelines and “eyeballing” it to ensure proper fit. Then I added beads of Liquid Nails along the sides of the frame. Finally, I laid some heavy college textbooks (thanks, Norton Anthology of American Literature, I finally found a use for you!) on top of the frame to weigh it down.
So that’s where I am at the moment. I’m hoping by the end of next week my track will be here, and I’ll be able to start working on a trackplan. I’m going to try and get my basic loop done first, and any turnouts will have to come later. I have been considering a double track main, but when I think about the prototype (small mining subsidiary), that makes no sense. So I’m still thinking about it.
Friday, April 10, 2009
I was framed!
Working for higher education has its perks, and since I had the day off today I was finally able to get started on this project.
Model Railroads don’t just hang in midair. They have to sit on “benchwork.” An evil word, to be sure, and one which I wish I didn’t have to deal with. I hate messing with benchwork. It’s a pain in the butt. My last layout, I used a traditional wood frame made of 2x4s, topped by a ½ inch thick sheet of cheap plywood. Of course, the wood was warped in about 5 minutes thanks to Waco’s wonderful humidity. So the whole layout was kind of “wompy-jogged.” Interesting fact: wood is heavy. You may not think so, since wood can float in water. But it is heavy. Now think: I’m still in college. This thing is going to be moved a number of times. See where I’m going? Bad idea.
So I was never really happy with the benchwork, but I put up with it, because unlike virtually everything else on the layout, you can’t rip up the benchwork and redo it. Once it’s done, it’s DONE.
So for this layout, I’m using “modern” construction method of pink/blue foam insulation. Of course, you still need some sort of frame to hold all this stuff. I wanted it to be lightweight, but still sturdy. My Dad had the suggestion that I use PVC pipe. The more I thought about this, the more I liked it. It’s strong, lightweight, and can be put together very quickly. My only concern was how I was going to build legs for it. Ideally you could get a coupling that was a corner with a third exit going down. But I didn’t see any of those online.
So, off I go to Lowe’s—the first of no doubt many trips.
The first thing I did at Lowe’s was check out the foam sheet situation. They had the blue variety, but only in ½ inch. 10 bucks a sheet. This was disappointing as I wanted 2 inch sheets. And $40 is a lot to spend on foam. So I decided to pass on that for the time being.
On to the PVC. When I finally found the stuff (oh yeah…the plumbing section, why didn’t I think of that), my eye caught hold of a 48” long pipe with threads on either end. Hey…that’s the exact height that I wanted my layout legs to be! I started looking at the various couplings available, and found a “T” that snaps on to the exterior of section of PVC, and has threads for screwing on the aforementioned legs. So…the legs problem has a potential solution.
Next I looked at the various lengths and sizes of PVC available. I had thought that I would want 1 inch, but quickly found out that was gigantic. ¾ inch looked about right. I was elated to find out that the pipe was available in 5 ft sections. I was worried that they would only have the big long sections and I would have to get someone to cut it for me. You can’t fit all this stuff in the back of a VW! So I picked up a scary-looking generic pipe cutting tool ($10 for something I’ll probably use once every 5 years at the most), five lengths of 5-foot ¾ inch pipe, 6 t-joints, and a bag of corners. I had initially planned on getting the foam, too, but I was disappointed with the ½ sheets and thought I would give Home Depot a try. So $45 later I’m on the way home.
I set up a cardboard table in the living room as a makeshift work bench—the guest bedroom (neé layout room) doesn’t have a TV, and there was a Doctor Who marathon on. Woot! Now, I had already drawn out the entire plan before hand, so theoretically it was just a matter of getting the various lengths of tubing cut.
I quickly realized, however, that this wasn’t going to be that easy. You see, PVC couplings don’t butt sections of pipe end-to-end. No, it adds about 1 inch to the inside. So I knew that I had to reduce my measurements some in order to end up with a finished product the size that I wanted.
Now for those of you that don’t know me that well, let me just say this: I hate math. I’m only good at math if I have an HP calculator. Oh, I do all right with something tangible, like Lego bricks. I can usually tell with a casual glance if a piece is 6, 8, or 12 studs long, and how many Lego units high it is. But to do real-world math, in my head? Forget that. If I want to do math in my head, I have to imagine a sheet of paper, and then imagine a pencil writing out the figures and physically doing the work.
The long and short of it is that I was wracking my brain trying to figure out exactly what needed to be cut, and I finally came to the conclusion that since I didn’t have the foam yet, it didn’t really matter as long as I was consistent across the board. So I decided that ½ inch would do it, and cut my first length of pipe.
Well, that was easy. Those aforementioned pipe-cutting shears I got cut through the PVC like butter. I used a “Quik-Grip” to hold the pipe to the cardboard table. Those things are great, by the way. You should get some if you don’t have any. Keep them around the house and in the car. Take them with you to work. You’ll always be able to get a grip on the situation.
The frame came together very quickly after that first timid cut. I would say it took about 30 minutes to get the whole thing cut out. Of course, I ended up being short about 1 foot of pipe. Sigh. Story of my life. Time for another trip to the hardware store. I decided to check out Home Depot this time. I was elated to find that they have 1 inch thick foam sheets for only 12 bucks, which means I can get two for $25 and have enough left over for most of the scenery. So I’ll be foam-buying tomorrow.
Frustratingly, Home Depot only had the ginormous lengths of PVC pipe, and not the five-foot lengths. I also couldn’t find the leg-pipes (I had determined that I needed at least two more. So I had to skip over to Lowe’s to pick up more pipe. After Lowe’s, I hit up Hobby Lobby to see what kind of stuff they had. Sure, I’m not laying track yet, but I will be soon, so I might as well go ahead and buy a bunch.
Well that’s where I hit my first major snag in this layout.
I scan the shelves (by the way, the checkout lines were 10-people deep. It’s like this EVERY Time I go to Hobby Lobby). Anyway, I scan the shelves. You got your Woodland Scenics (hey! You can get DPM buildings here now, too!), you got your Bachmann junk. Your Model Power slightly-better-junk…..Hey, wait a minute….where’s the Atlas Snap-Track? I don’t see any track. I look more closely. I don’t see ANY Atlas product at all.
WTF!? They’re only the world’s largest track manufacturer! How can you NOT carry them! I don’t know if Hobby Lobby and Atlas had a falling out or what, but they aren’t carried by them anymore. I checked Atlas’ store locator. Nope, nada, zilch.
Deterred, I decided to stop by the Local Hobby Shop. Now I haven’t been in this place in about 5 years. The last time I was there, they had inventory from the 70s gathering dust. A sad site, but I thought I would do the community good and give them my business.
I was not encouraged when I drove up and saw dusty model rockets in the place where previously there were dusty trains. Come to find out, he got out of the model railroad business years back.
Well…Shit! That means the closest place to buy track was TEMPLE. And I’m not driving 40 miles to find some dinky local hobby shop that has very little inventory. I considered driving to Dallas on Monday to go to Discount Model Trains (A GREAT Train store—lots of good stuff!), but I looked around online and found discounttrainsonline.com (not related to the aforementioned store). They offered flat $7.95 shipping on any size order. I quickly calculated and realized that I would spend double that in gas getting to Dallas. So I gave in and placed a $55 order with them. Hopefully they are good!
Anyway, after all that jazz and running around I was dead tired so after cutting the final piece and putting the frame together, I called it a day. I’m still not sure about the layout legs, yet…they are a little iffy. But more on that in the next post—and I’ll try to get some pictures up, too…
Tuesday, April 7, 2009
And so it begins...
Welcome, readers. Seriously. (Again).
Some of you may remember me from my previous blog, which detailed my adventures in the Baylor in Oxford program in the summer of 2005. I had a lot of fun writing that blog, but I ultimately decided that I would leave the blog be once the adventure was over. I have a hard time justifying posting random blatherings that no one really cares about—that’s what Twitter is for, after all! (follow Cameron_Talley if you want to know more!).
What then, you may ask, prompts the creation of this new abomination of literature on the interwebs? That is a good question. Given my philosophy on blogging, surely there is a method to this madness, some reason for this new insanity.
Of course there is. And what, pray tell, is that reason? I shall tell you.
The other day I was cleaning up the guest bedroom, and I looked at my dilapidated N Scale railroad, sitting and gathering dust in the corner. I had not touched it for nearly 3 years—ever since I moved to my current apartment. Suddenly I got the urge to run the trains a little bit, just for the heck of it. So I get out the transformer, hook everything up, set the toggle switches and…..nothing. No movement. I give the Kato Mikado a little nudge, and it inches forward, stuttering. It seems the track had gone without a cleaning for far too long. I finally got the Mike moving a little, only to have the train get stuck in the tunnel. The one I can’t access without moving the whole damn layout out from the wall.
Son of a bitch.
And I got to thinking. Why do I still have this thing? It was started when I was a Freshman at Baylor, in the dorm, 8 years ago now. It was constructed using old-style methods of 2x4 benchwork and a plywood base, which had promptly warped in the Waco humidity. It had 9.75” radius track throughout (the whole layout is only 2’ by 3’), which looks bad and runs even worse. The scenery was pretty ugly-looking, a poor first attempt that clearly needed a do-over. I was never going to be happy with this.
Dejected, I packed the power pack away and rerailed the locomotive and cars, parking them to gather dust once more. But as I looked at the Mike, and the Shay sitting woefully neglected behind it, the drive rods in my brain began to slowly turn. I began visualizing how the furniture could be moved. How I could have enough space for 11” curves (or greater!) and more than 14 inches of straight track. Most of all, my blood started getting that feeling again—a longing for soot and grime, good old West Virginia Coke, and a return to an era where there was no more beautiful a woman than a N&W Class A, her drivers spinning as she barreled down the line, bringing the fuel that propelled a nation.
So I’m going to do it. I’m going to scrap the old layout and start over. I’m going to take what I’ve learned and improve upon my last effort. I’m going to spend way more money than I have on trivial things like wiring and switches and tiny little plastic people (Which are damn expensive, by the way).
When it’s all said and done, I’m going to descend into that railroading euphoria, that madness, once again.
So to get off on the right track (I promise I will keep these puns to a minimum), let’s take a look at my old layout:

Yes, here it is, in all its glory. This is near the end of its life. It took nearly 5 years to get to this point. Ugly, isn’t it? Unfortunately, it’s all I had room for in the dorm. I made a lot of mistakes with this one, which I intend to rectify with this new layout. Some things I have learned to get us started:
So there it is. I’ll be keeping track of my progress on this blog. I don’t know how frequent updates will be, but I’ll try to keep a pretty good update schedule. Of course, some of that depends on my progress! I’m going to set a tentative goal of having a golden spike run in about a month.
Until next time!
Some of you may remember me from my previous blog, which detailed my adventures in the Baylor in Oxford program in the summer of 2005. I had a lot of fun writing that blog, but I ultimately decided that I would leave the blog be once the adventure was over. I have a hard time justifying posting random blatherings that no one really cares about—that’s what Twitter is for, after all! (follow Cameron_Talley if you want to know more!).
What then, you may ask, prompts the creation of this new abomination of literature on the interwebs? That is a good question. Given my philosophy on blogging, surely there is a method to this madness, some reason for this new insanity.
Of course there is. And what, pray tell, is that reason? I shall tell you.
The other day I was cleaning up the guest bedroom, and I looked at my dilapidated N Scale railroad, sitting and gathering dust in the corner. I had not touched it for nearly 3 years—ever since I moved to my current apartment. Suddenly I got the urge to run the trains a little bit, just for the heck of it. So I get out the transformer, hook everything up, set the toggle switches and…..nothing. No movement. I give the Kato Mikado a little nudge, and it inches forward, stuttering. It seems the track had gone without a cleaning for far too long. I finally got the Mike moving a little, only to have the train get stuck in the tunnel. The one I can’t access without moving the whole damn layout out from the wall.
Son of a bitch.
And I got to thinking. Why do I still have this thing? It was started when I was a Freshman at Baylor, in the dorm, 8 years ago now. It was constructed using old-style methods of 2x4 benchwork and a plywood base, which had promptly warped in the Waco humidity. It had 9.75” radius track throughout (the whole layout is only 2’ by 3’), which looks bad and runs even worse. The scenery was pretty ugly-looking, a poor first attempt that clearly needed a do-over. I was never going to be happy with this.
Dejected, I packed the power pack away and rerailed the locomotive and cars, parking them to gather dust once more. But as I looked at the Mike, and the Shay sitting woefully neglected behind it, the drive rods in my brain began to slowly turn. I began visualizing how the furniture could be moved. How I could have enough space for 11” curves (or greater!) and more than 14 inches of straight track. Most of all, my blood started getting that feeling again—a longing for soot and grime, good old West Virginia Coke, and a return to an era where there was no more beautiful a woman than a N&W Class A, her drivers spinning as she barreled down the line, bringing the fuel that propelled a nation.
So I’m going to do it. I’m going to scrap the old layout and start over. I’m going to take what I’ve learned and improve upon my last effort. I’m going to spend way more money than I have on trivial things like wiring and switches and tiny little plastic people (Which are damn expensive, by the way).
When it’s all said and done, I’m going to descend into that railroading euphoria, that madness, once again.
So to get off on the right track (I promise I will keep these puns to a minimum), let’s take a look at my old layout:
Yes, here it is, in all its glory. This is near the end of its life. It took nearly 5 years to get to this point. Ugly, isn’t it? Unfortunately, it’s all I had room for in the dorm. I made a lot of mistakes with this one, which I intend to rectify with this new layout. Some things I have learned to get us started:
- Benchwork first, then track plan. On this previous layout, I made the mistake of using paper Atlas track planning templates to block out (on posterboard) the track plan. But when I actually started laying track, I found that my carefully concocted plan wouldn’t actually work in the real world. It just didn’t fit together right. So from day one, there was compromise. Never again. I’ll build the basic benchwork, and then I’ll use the actual track to come up with a plan that fits without compromise (which only leads to headaches!)
- On the topic of benchwork: NO PLYWOOD. It’s so passé nowadays, anyway. All the cool model railroaders use foam. Of course, you still need a frame; My Dad suggested using PVC pipe, which is lightweight and strong. The old layout, which was built with 2x4s and a “plywood plains” top sheet, was a pain to move. It was heavy, and the flat plywood didn’t allow any kind of scenery contour. So I’m going with 2” foam on top of a PVC frame.
- No curves smaller than 11” radius. The previous layout was restricted to 9.75” curves. They look bad. They are tough on long steam locos—some will run, others will not. Same with rolling stock. So 9.75” curves are out.
- NO TUNNELS. I had the brilliant idea last time of putting a turnout in a tunnel. Not to mention the sharp curves in the tunnel. I did have access panels in the back, and they helped tremendously. Until I moved, and the layout had to be put in the corner, where I couldn’t get to the back very easily. You couldn’t reach the track to clean it. God forbid you had a derailment, too. It became a nightmare, and one of the primary reasons I haven’t messed with the layout for over 2 years. So, no tunnels. All the track will be exposed. Depending on the trackplan, I may use a scenic divider down the middle. It’s still up in the air at this point.
- Electro-frog switches, at least for mainline. I have had NO LUCK at all with the standard Atlas switches. They have a plastic frog, and my steam locos tend to stall. So I’m going to try and go with Electro-frog switches, which will complicate the wiring somewhat, but which will hopefully work better overall.
So there it is. I’ll be keeping track of my progress on this blog. I don’t know how frequent updates will be, but I’ll try to keep a pretty good update schedule. Of course, some of that depends on my progress! I’m going to set a tentative goal of having a golden spike run in about a month.
Until next time!
Subscribe to:
Posts (Atom)
